The REST API
The S1 system supports the REpresentational State Transfer (REST) architectural style, which enables you to access and interact with its resources through a RESTful API (Application Programming Interface). This API follows standard HTTP methods like GET, POST, PUT, and DELETE, allowing for efficient data exchange and manipulation. Embracing the stateless and cacheable nature of REST, the S1 system ensures scalability and easy maintenance. It provides a user-friendly and standardized approach, making it seamless to retrieve, create, update, and delete data from S1’s resources, facilitating smooth integration for developers and users.
What is a REST API?
A REST API is a set of rules and conventions that define how communication and data exchange should occur between a client and a server over the internet.
-
REST: Representational State Transfer is an architectural style that defines a set of constraints for designing networked applications. It emphasizes simplicity, scalability, and statelessness. RESTful systems use standard HTTP methods (GET, POST, PUT, DELETE, etc.) to perform operations on resources and return data in common formats like JSON or XML.
-
API: Application Programming Interface is a set of rules and protocols that allow different software applications to communicate and interact with each other. APIs define the methods and data formats that applications should use to request and exchange information.
-
REST API: A REST API adheres to the principles of REST and serves as an interface that allows clients, such as web or mobile applications, to interact with a server. It defines the endpoints (URLs) that clients can access to perform specific actions, such as retrieving data, creating, updating, or deleting resources.
The REST API provided by the S1 servers consists of rules and endpoints that clients can use to access and interact with S1 resources. When clients want to interact with the S1 REST API, they send HTTP requests to specific URLs (endpoints) hosted on the S1 servers. The servers process these requests, perform the necessary operations on their resources, and return HTTP responses with the requested data or status information.
Typically, a REST API is implemented within a programming language. This allows developers to use various programming languages to send HTTP requests to the REST API and handle the responses received from the server. This enables the client application to interact with the server and utilize the services and resources provided by the API.
Any programming language can be used to interact with a REST API. However, JavaScript, being the native language of the web, is the most commonly used for client-side interactions with a REST API. Using AJAX or the Fetch API, developers can easily send HTTP requests and handle responses within the web browser environment.
RESTful API methods
The standard HTTP methods specifically defined for RESTful APIs are:
- GET
- POST
- PUT
- DELETE
- PATCH
- HEAD
- OPTIONS
These methods cover the essential CRUD (Create, Read, Update, Delete) operations and other functionalities required for interacting with resources in a RESTful manner.
The S1 interactive guide for REST API
The S1 system provides an interactive guide for the its REST API. To view this guide, open your favorite browser and enter the IP or the domain name of one of the node servers.
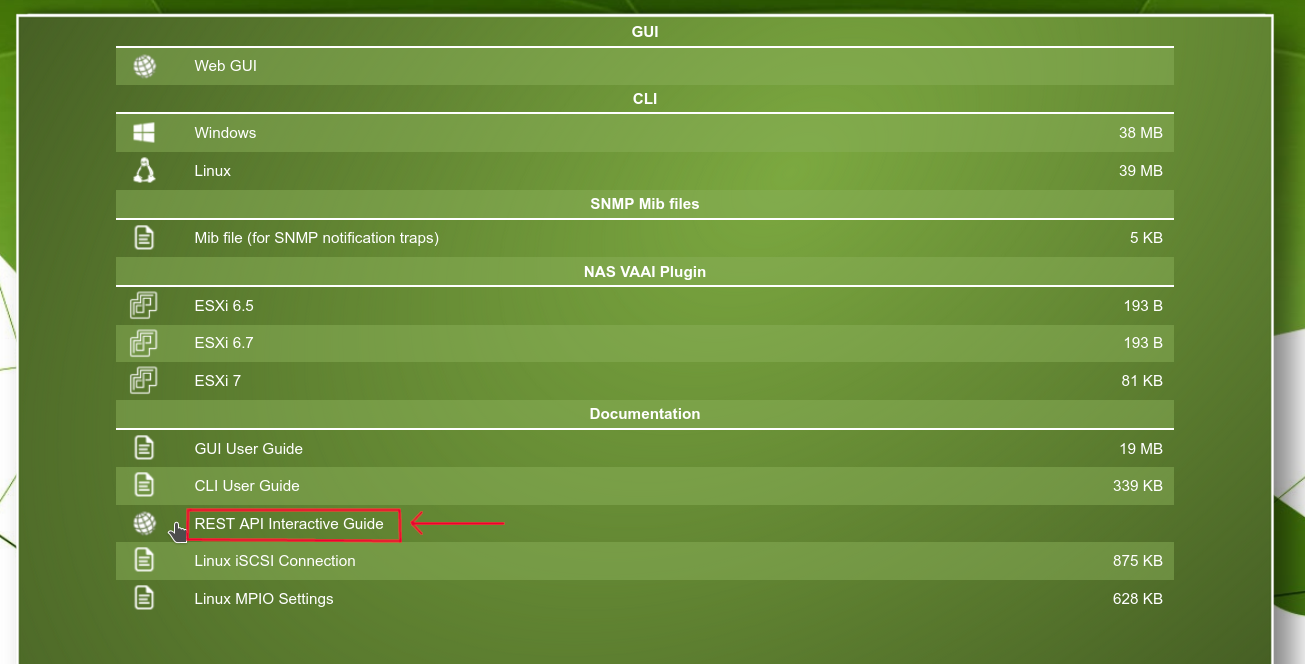
Select REST API Interactive Guide, the S1 interactive guide for the REST API will be opened
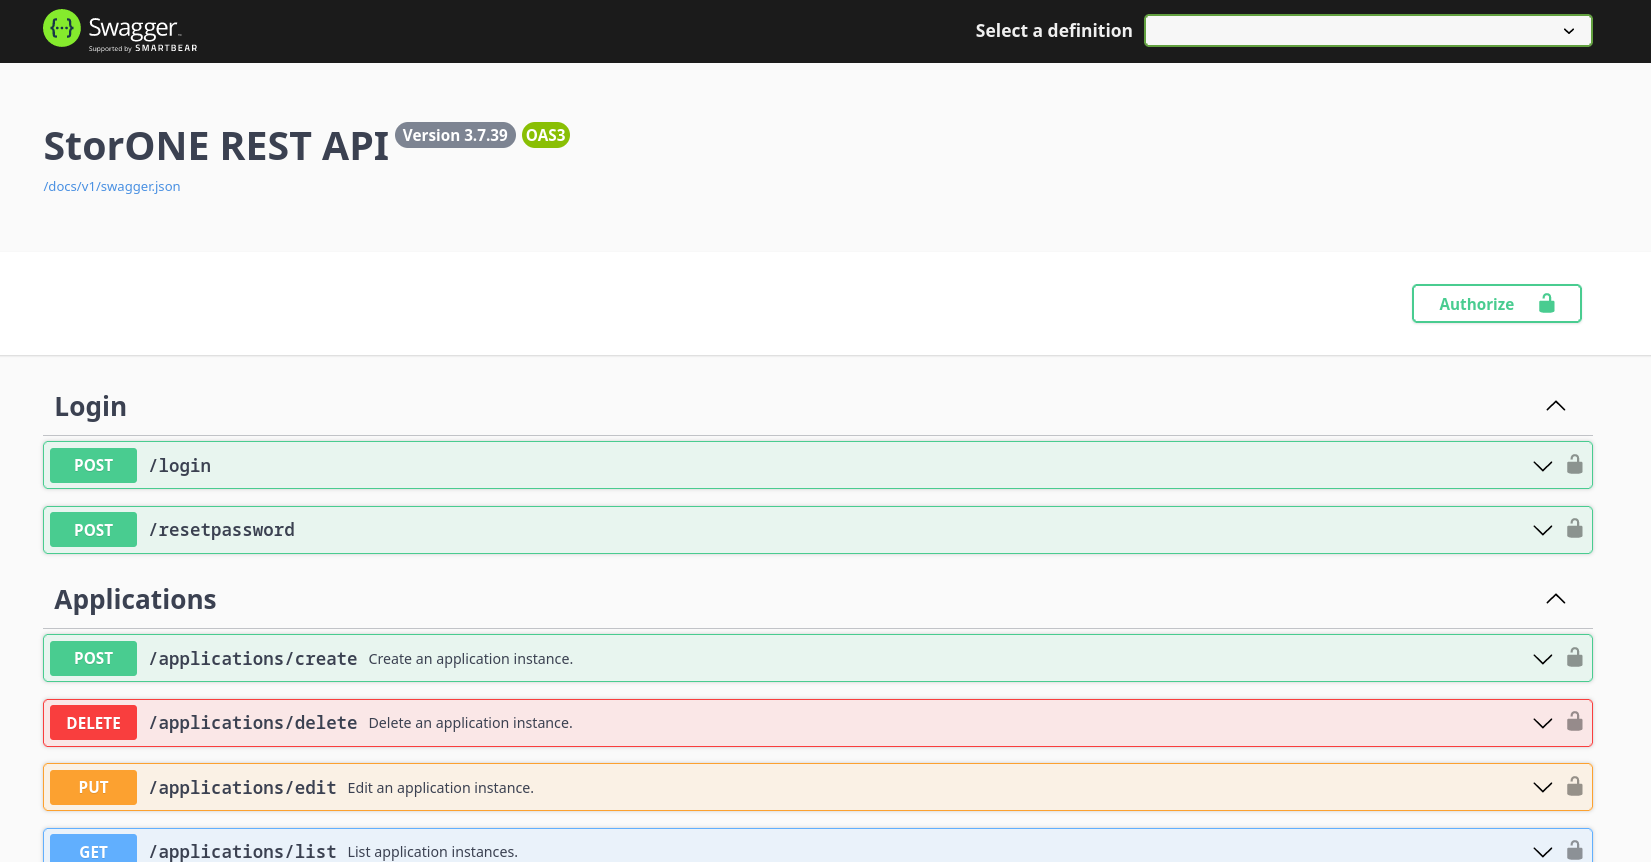
The interactive guide is divided into the following sections:
- Login
- Applications
- Configurations
- Floatingips
- Hosts
- Monitoring
- Nas_servers
- Nodes
- Notifications
- Replication
- Resources
- Settings
- Systems
- Templates
- Users
- Version
- Workflows
- Vcp
- Schemas
With the exception of the Schemas section, each section corresponds to an operation that can be executed on the S1 system. All sections are collapsible, providing a detailed explanation of their respective operations. The corresponding REST method can be found on the left of each of these operations.
The Schemas section is a syntax reference guide, providing a brief description and a syntactical guide for each of the operations.
Navigating the S1 REST API Guide
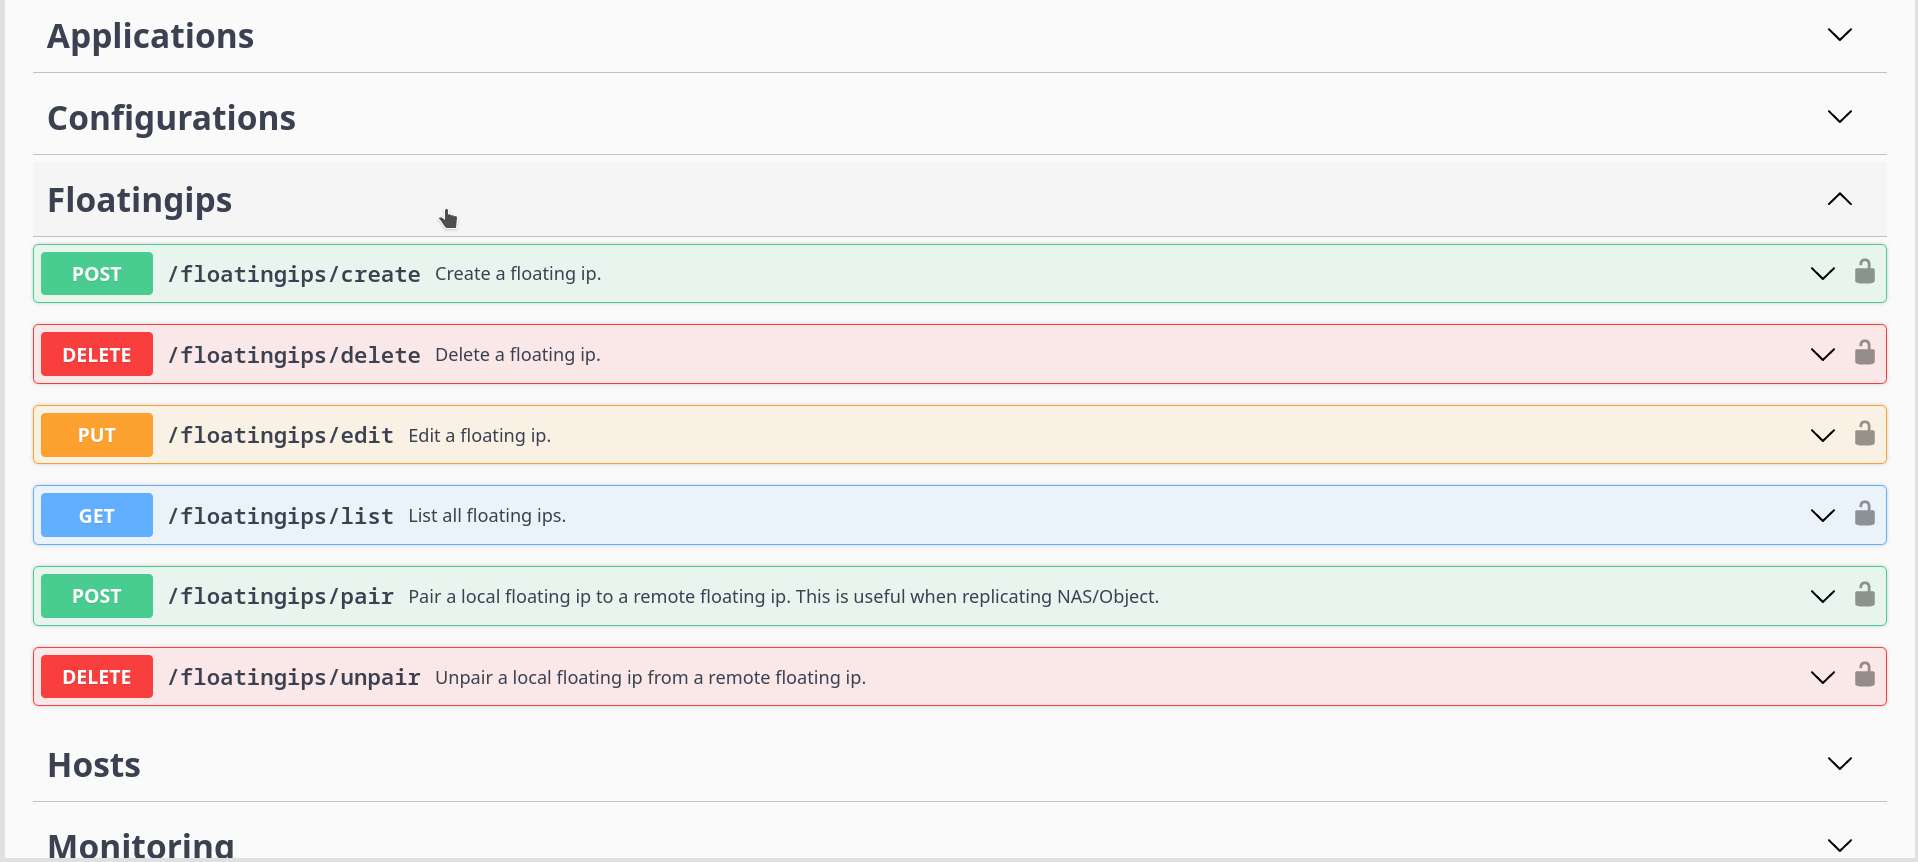
The documentation for each of the operations consist from three main subsections:
- Parameters
- Request body
- Responses
For example, the following figure illustrates this structure for the resetpassword operation
Examples are provided for each of the operations. You may try these examples by using the curl command. To interact with the REST code using the curl command:
- Select an operation to expand.
- In the Parameters subsection, modify the parameters according to your needs.
- Select Try it out (see the above illustration).
- Select Execute.
The following figure illustrates the status of the applications list operator, before selecting Execute.
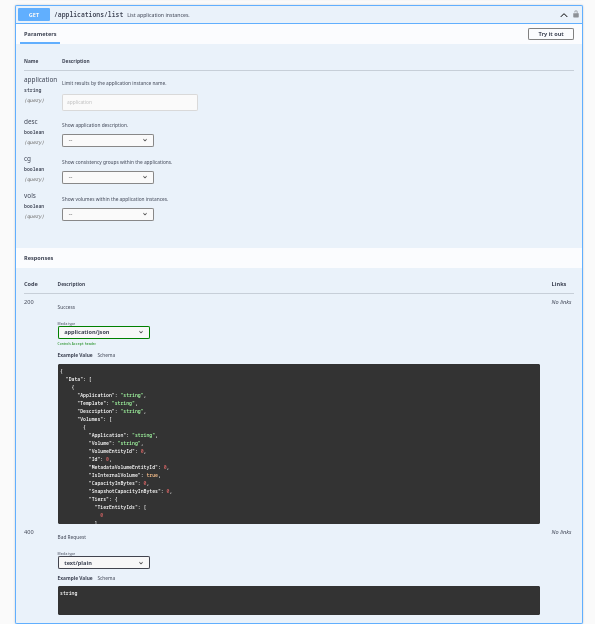
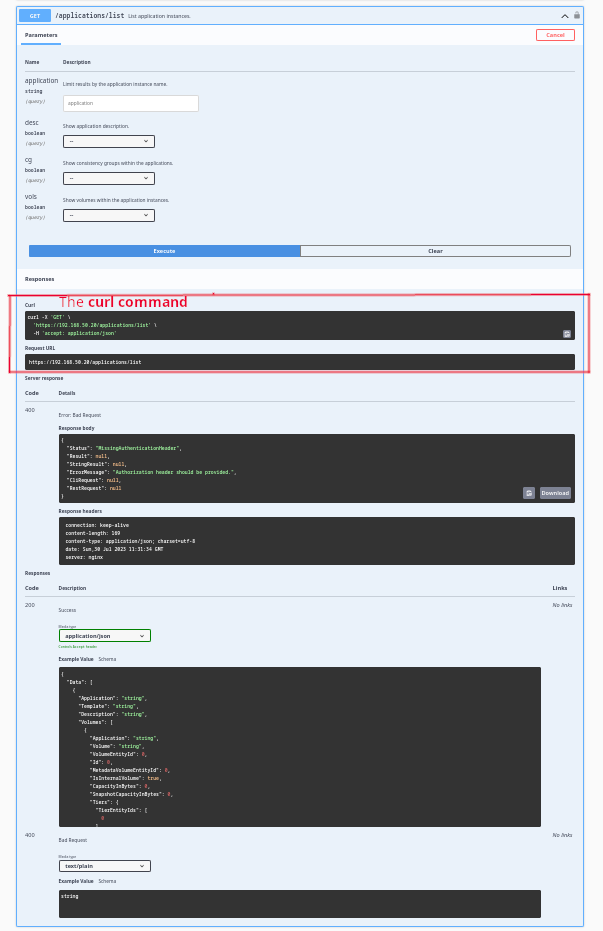
modify the code and select Execute. The system will output a curl command according to your parameters.
-
Open your terminal and use the curl output to try the command. In the example above, you may try the following:
curl --insecure -X GET \
'https://192.168.50.20/applications/list' \
-H 'accept: application/json' \
-H 'Content-Type: application/json-patch+json' \
-u 'user1:StorWTR1!'
Replace user1:StorWTR1! with your user name and password. Adjust -u <your-username>:<your-passwerd> accordingly.
Examples in Javascript
While any programming language can interact with a REST API, JavaScript, as the native language of the web, is the most commonly used for client-side interactions with a REST API. Here are a few examples to get you started on how to interact with the S1 REST API using JavaScript.
Before you begin
Make sure that your are connected to the relay of your S1 appliance.
Login
The following example displays login information. Open your favorite editor and insert the following code:
<!DOCTYPE html>
<html>
<head>
    <title>S1 REST API login information</title>
</head>
<body>
    <h1>S1 REST API Interaction</h1>

    <div id="apiOutput">
        <!-- API response will be displayed here -->
    </div>

    <script>
        // Function to perform the POST request to the API
        function loginToAPI() {
            const apiUrl = 'http://192.168.50.20/login';
            const headers = {
                'Accept': 'application/json',
                'Content-Type': 'application/json'
            };

            const data = {
                Username: 'user1',
                Password: 'StorWTR1!'
            };

            fetch(apiUrl, {
                method: 'POST',
                headers: headers,
                body: JSON.stringify(data)
            })
            .then(response => response.json())
            .then(data => {
                // Handle the API response data
                const apiOutputDiv = document.getElementById('apiOutput');
                apiOutputDiv.innerHTML = JSON.stringify(data, null, 2);
            })
            .catch(error => {
                console.error('API Error:', error);
            });
        }

        // Call the function to perform the POST request to the API
        loginToAPI();
    </script>
</body>
</html>
-
Replace IP
192.168.50.20inhttp://192.168.50.20/loginwith the IP address of your node server. -
In the
          const data = {
             Username: 'user1',
             Password: 'StorWTR1!'
         };
section. Replace
user1with your login user name andStorWTR1!with your login password. -
Save as s1-login-info.html and use your favorite web browser to open it.
Your browser will display JSON-style syntax text similar to the following:
{ "SessionToken": "fc8f93d1-77d3-4186-9e18-d5b44df07115_9b22a576-e5b9-43c5-996f-0e70dc9f59ce_f5822b09-3870-4b09-9179-b6ee2aa6f4ee", "UserEmailAddress": "test@none.com", "Status": "Ok", "Details": null }
Listing application instances
The following example list all application instances in the S1 system. Open your favorite editor and insert the following code:
<!DOCTYPE html>
<html>
<head>
    <title>S1 REST API: List of application instances</title>
</head>
<body>
    <h1>S1 REST API: List of application instances</h1>

    <div id="apiOutput">
        <!-- API response will be displayed here -->
    </div>

    <script>
        // Function to perform the URL request to the API with basic authentication
        function fetchDataFromAPI() {
            const apiUrl = 'http://192.168.50.20/applications/list';
            const username = 'user1';
            const password = 'StorWTR1!';

            // Encode the username and password in Base64 format for basic authentication
            const base64Credentials = btoa(`${username}:${password}`);
            const headers = {
                'Accept': 'application/json',
                'Content-Type': 'application/json',
                'Authorization': `Basic ${base64Credentials}` // Add the Authorization header
            };

            fetch(apiUrl, {
                method: 'GET',
                headers: headers
            })
            .then(response => response.json())
            .then(data => {
                // Handle the API response data
                const apiOutputDiv = document.getElementById('apiOutput');
                apiOutputDiv.innerHTML = JSON.stringify(data, null, 2);
            })
            .catch(error => {
                console.error('API Error:', error);
            });
        }

        // Call the function to perform the URL request to the API
        fetchDataFromAPI();
    </script>
</body>
</html>
-
Replace IP
192.168.50.20inhttp://192.168.50.20/loginwith the IP address of your node server. -
Look for the lines
         const username = 'user1';
         const password = 'StorWTR1!';
Replace
user1with your login user name andStorWTR1!with your login password. -
Save as s1-list_of_app_instances.html and use your favorite web browser to open it.
Your browser will display JSON-style syntax text similar to the following:
{ "Status": "Ok", "Result": { "Data": [ { "Application": "from_template2" }, { "Application": "HR" }, { "Application": "HR Sale" }, { "Application": "HR sales" }, { "Application": "HR, sales" }, { "Application": "sales" }, { "Application": "yy" }, { "Application": "yy-vol" } ] }, "StringResult": null, "ErrorMessage": null, "CliRequest": [ "applications list" ], "RestRequest": [ { "Method": "Get", "Url": "applications/list/?desc=False&cg=False&vols=False", "Body": null } ] }